|
|
|
|
Working with Pictures
Pictures can be used in several ways in Bryce. They can be used as 2D Pict Objects or as components in materials or gels.
When you use a picture as an object, it is applied to a 2D plane and appears as an object in the Working window. Refer to "Creating a Pict Object" for more on creating 2D Pict Objects.
When you use a picture as a material component, the image is applied to a material channel, where its values are used to drive the value of the channel. Refer to "Applying Materials" for more on working with Materials.
When you use a picture as a gel, the image is placed in front of the light and appears as a projection. Refer to "Applying Gels" for more on gels.
Alpha Channels
Every image contains a number of channels that store data about the makeup of the picture. For instance, channels can contain masks, colors, or bump information.
The alpha channel of an image is its first channel. The channel is like a grayscale map that accompanies an image that is used primarily as a "mask." Areas in the alpha channel that are black (appearing transparent) are ignored by the Bryce as it computes the picture. Bryce recognizes and computes areas that are white (appearing opaque).
The most common use for alpha channels is to mask the contours of a 2D object, separating it from any unwanted background information. For instance, you may import a picture of a dog. If you have created an alpha channel "mask" describing the area of the dog as white and the "non-dog" area as black, then unwanted cats and mail carriers in the original picture's background will not be seen in your rendered image.
In Bryce, Alpha channels are also used when your picture is a component in a material. In this case the alpha channel can be used to determine everything from the bumps in a material to how a surface property is applied on an object. Refer to "2D Textures" for more on using pictures in a material.
If you want to use the picture in the library for multiple purposes, you'll need to make sure that all the pictures have an alpha channel.
The Picture Library
The Picture Library stores all the images available in Bryce and can be used to catalog pictures. You can store and import any number of pictures in the library that your system memory and disk space will allow.
There are two ways of accessing the Picture Library. The method you use depends on how you're going to use the image.
To access the Picture Library from the Create palette:
To access the Picture Library from the Materials Lab:
2 Click the M icon that appears next to the object's bounding box. The Materials Lab appears.
3 Click on one of the columns in the grid to activate a component window.
4 In the window, click the P button in the bottom-left corner. A default picture appears in the window.
5 Click the Pink button at the top of the window. The Picture Library appears.
To access the Picture Library from the Light Editor:
2 Click the E icon that appears next to the object's bounding box. The Light Editor appears.
3 Click the 2D Texture button at the bottom of the editor. The library appears.
Previewing Pictures
The three most prominent items at the top of the library are the RGB Image, Alpha, and Combined preview windows. The first window displays the current picture, the second window displays the alpha channel associated with the picture, and the third displays the resulting picture after the alpha channel is combined with the picture.
Picture Thumbnails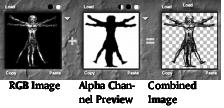
Below the three preview windows are the picture thumbnails that display a small preview of each picture in the library. The gray thumbnails represent empty slots in the library. When you load images, they are added to the first available gray slot.
If there are a large number of pictures in the library, you can use the scroll bar to scroll through all the thumbnails.
To display an image in the library:
- Click on the picture's thumbnail. The picture and its associated alpha channel appear in the three preview windows at the top of the dialog.
Loading Pictures Into the Library
You can load pictures into the library to create your own custom library. Pictures can be loaded into any of the three preview windows. If you want to add a new picture to the library, you need to load it into the last preview window, the Combined Image window.
When you load a picture into the first window, you're loading only the picture's RGB (Red, Green, and Blue) color information.
The picture loaded into the first preview window replaces the currently selected picture in the library, so you're replacing a picture in the library with the picture you're loading.
When you load a picture into the second window, you're loading only the picture's alpha channel.
The alpha channel determines which portions of the picture are visible. The areas of the picture that are transparent appear as a checkerboard pattern.
Every picture should have an alpha channel assigned to it. If the picture does not have an alpha channel, the resulting image appears completely white.
If your picture doesn't have an alpha channel, you can copy the image from the RGB Image window into the Alpha Channel window. This way your picture won't appear completely opaque.
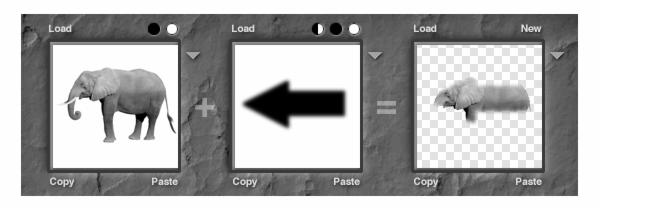
The Alpha channel you load does not have to necessarily match the image. You can create some interesting clipping effects by combining different alpha channels and images.
In this example, the image was combined with a different alpha channel to create a new clipping effect.
To replace the RGB information in a picture:
1 Click the thumbnail of the picture you want to replace.
2 Click the Load button on top of the RGB Image window. The Load dialog appears.
3 Use the dialog controls to locate the desired image and click Load.
The picture appears in the first preview window.
To replace the Alpha channel information in a picture:
1 Click the thumbnail of the picture you want to replace.
2 Click the Load button on top of the Alpha Channel window. The Load dialog appears.
3 Use the dialog controls to locate the desired image and click Load.
The picture's alpha channel appears in the first preview window.
To load a new picture into the Library:
1 Click the picture slot in the bottom of the library where you want to load the new picture.
2 Use the dialog controls to locate the desired image and click Load.
The picture's thumbnail appears in the picture slot.
Copying and Pasting Pictures
Copying and pasting in the Picture Library works differently for each of the three image windows.
When you copy and paste into the first window, you're pasting only RGB color information, so if you copy an image from the Combined window, only the color information is pasted into the RGB window.
As with loading, any changes you make in the RGB Image window affects the selected image.
When you copy and paste into the second window, you're working with only the Alpha Channel information, so any image you paste into this window will appear as an alpha channel image (that is, black and white). Any changes you make in this window affect only the selected image.
When you copy an image from the Combined window the entire image is placed on the clipboard. Depending on where you paste it, only a portion of the image may be used.
When you paste a picture into the Combined window, it appears as a color image with transparent and solid areas. All pictures are treated as color. So if you paste a picture copied from the Alpha Channel window in this window, you'll get an RGB representation of the alpha channel image. As well, any image pasted into this window creates a new picture entry in the library.
To copy and paste RGB information in a picture:
1 Click the Copy button below the RGB Image window.
2 Click the Paste button below the window where you want the RGB image to appear.
To copy and paste Alpha Channel information in a picture:
1 Click the Copy button below the Alpha Channel window.
2 Click the Paste button below the window where you want the Alpha Channel information to appear.
To create a new picture using RGB color information only:
1 Click the Copy button below the RGB Image window.
2 Click the Paste button below the Combined window. The RGB information is placed in an empty slot in the library.
To create a new picture using Alpha channel information only:
1 Click the Copy button below the Alpha Channel window.
2 Click the Paste button below the Combined window. The alpha channel information is placed in an empty slot in the library.
Deleting Pictures
When you delete a picture, you remove all the image information (including color and alpha channel) from the library.
To delete a picture from the library:
1 Click the thumbnail for the picture you want to delete.
2 Click the Delete Pict button.
To delete all pictures from the library:
Inverting the Alpha Channel
When you invert an alpha channel all the black areas become white and the white areas become black. This means that all the areas that were transparent now become solid and vice versa.
To invert an alpha channel:
Picture Lists
A Picture List is a file that contains a group of pictures. A Picture list can be used to store all the pictures used in a given scene, or to store a series of pictures you use most often.
You should also use a picture list to store any pictures you've used as part of a material.
There are several Pict texture List files provided as samples for your first excursions.
To open a picture list:
1 Click the Open List button at the bottom of the Picture Library. The Open dialog appears.
2 Use the dialog controls to locate the desired list and click Open. The pictures in the list appear in the library.
To save a picture list:
1 Click the Save List button at the bottom of the Picture Library. The Save dialog appears.
2 Enter a name for the list and click Save.
Name the list the same as the scene. This way, you can easily find the list that belongs to a specific scene.
 Corel Corporation http://www.corel.com Voice: (800) 772-6735 Fax: (716) 447-7366 www.corel.com/support |